SYSTEM
ByteBuf
src/content/notes/system/ByteBuf.md ByteBuf
基本介绍
ByteBuf 是对字节数据的封装,优点:
- 池化,可以重用池中 ByteBuf 实例,更节约内存,减少内存溢出的可能
- 读写指针分离,不需要像 ByteBuffer 一样切换读写模式
- 可以自动扩容
- 支持链式调用,使用更流畅
- 零拷贝思想,例如 slice、duplicate、CompositeByteBuf
创建方法
创建方式
ByteBuf buffer = ByteBufAllocator.DEFAULT.buffer(10):创建了一个默认的 ByteBuf,初始容量是 10
public ByteBuf buffer() {
if (directByDefault) {
return directBuffer();
}
return heapBuffer();
}-
ByteBuf buffer = ByteBufAllocator.DEFAULT.heapBuffer(10):创建池化基于堆的 ByteBuf -
ByteBuf buffer = ByteBufAllocator.DEFAULT.directBuffer(10):创建池化基于直接内存的 ByteBuf -
推荐的创建方式:在添加处理器的方法中
pipeline.addLast(new ChannelInboundHandlerAdapter() { @Override public void channelRead(ChannelHandlerContext ctx, Object msg) throws Exception { ByteBuf buffer = ctx.alloc().buffer(); } });
直接内存对比堆内存:
- 直接内存创建和销毁的代价昂贵,但读写性能高(少一次内存复制),适合配合池化功能一起用
- 直接内存对 GC 压力小,因为这部分内存不受 JVM 垃圾回收的管理,但也要注意及时主动释放
池化的意义在于可以重用 ByteBuf,高并发时池化功能更节约内存,减少内存溢出的可能,与非池化对比:
- 非池化,每次都要创建新的 ByteBuf 实例,这个操作对直接内存代价昂贵,堆内存会增加 GC 压力
- 池化,可以重用池中 ByteBuf 实例,并且采用了与 jemalloc 类似的内存分配算法提升分配效率
池化功能的开启,可以通过下面的系统环境变量来设置:
-Dio.netty.allocator.type={unpooled|pooled} # VM 参数- 4.1 以后,非 Android 平台默认启用池化实现,Android 平台启用非池化实现
- 4.1 之前,池化功能还不成熟,默认是非池化实现
读写操作
ByteBuf 由四部分组成,最开始读写指针(双指针)都在 0 位置
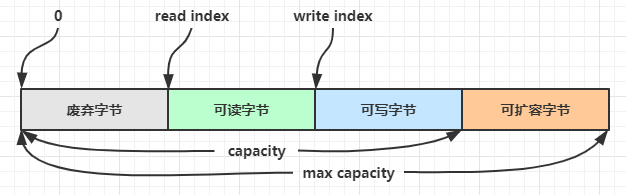
写入方法:
| 方法名 | 说明 | 备注 |
|---|---|---|
| writeBoolean(boolean value) | 写入 boolean 值 | 用一字节 01|00 代表 true|false |
| writeByte(int value) | 写入 byte 值 | |
| writeInt(int value) | 写入 int 值 | Big Endian,即 0x250,写入后 00 00 02 50 |
| writeIntLE(int value) | 写入 int 值 | Little Endian,即 0x250,写入后 50 02 00 00 |
| writeBytes(ByteBuf src) | 写入 ByteBuf | |
| writeBytes(byte[] src) | 写入 byte[] | |
| writeBytes(ByteBuffer src) | 写入 NIO 的 ByteBuffer | |
| int writeCharSequence(CharSequence s, Charset c) | 写入字符串 |
- 这些方法的未指明返回值的,其返回值都是 ByteBuf,意味着可以链式调用
- 写入几位写指针后移几位,指向可以写入的位置
- 网络传输,默认习惯是 Big Endian
扩容:写入数据时,容量不够了(初始容量是 10),这时会引发扩容
- 如果写入后数据大小未超过 512,则选择下一个 16 的整数倍,例如写入后大小为 12 ,则扩容后 capacity 是 16
- 如果写入后数据大小超过 512,则选择下一个 2^n,例如写入后大小为 513,则扩容后 capacity 是 2^10 = 1024(2^9=512 不够)
- 扩容不能超过 max capacity 会报错
读取方法:
byte readByte():读取一个字节,读指针后移byte getByte(int index):读取指定索引位置的字节,读指针不动ByteBuf markReaderIndex():标记读数据的位置ByteBuf resetReaderIndex():重置到标记位置,可以重复读取标记位置向后的数据
内存释放
Netty 中三种内存的回收:
- UnpooledHeapByteBuf 使用的是 JVM 内存,只需等 GC 回收内存
- UnpooledDirectByteBuf 使用的就是直接内存了,需要特殊的方法来回收内存
- PooledByteBuf 和子类使用了池化机制,需要更复杂的规则来回收内存
Netty 采用了引用计数法来控制回收内存,每个 ByteBuf 都实现了 ReferenceCounted 接口,回收的规则:
- 每个 ByteBuf 对象的初始计数为 1
- 调用 release 方法计数减 1,如果计数为 0,ByteBuf 内存被回收
- 调用 retain 方法计数加 1,表示调用者没用完之前,其它 handler 即使调用了 release 也不会造成回收
- 当计数为 0 时,底层内存会被回收,这时即使 ByteBuf 对象还在,其各个方法均无法正常使用
ByteBuf buf = .ByteBufAllocator.DEFAULT.buffer(10)
try {
// 逻辑处理
} finally {
buf.release();
}Pipeline 的存在,需要将 ByteBuf 传递给下一个 ChannelHandler,如果在 finally 中 release 了,就失去了传递性,处理规则:
-
创建 ByteBuf 放入 Pipeline
-
入站 ByteBuf 处理原则
-
对原始 ByteBuf 不做处理,调用 ctx.fireChannelRead(msg) 向后传递,这时无须 release,反之不传递需要
-
将原始 ByteBuf 转换为其它类型的 Java 对象,这时 ByteBuf 就没用了,此时必须 release
-
如果出现异常,ByteBuf 没有成功传递到下一个 ChannelHandler,必须 release
-
假设消息一直向后传,那么 TailContext 会负责释放未处理消息(原始的 ByteBuf)
// io.netty.channel.DefaultChannelPipeline#onUnhandledInboundMessage(java.lang.Object) protected void onUnhandledInboundMessage(Object msg) { try { logger.debug(); } finally { ReferenceCountUtil.release(msg); } } // io.netty.util.ReferenceCountUtil#release(java.lang.Object) public static boolean release(Object msg) { if (msg instanceof ReferenceCounted) { return ((ReferenceCounted) msg).release(); } return false; }
-
-
出站 ByteBuf 处理原则
- 出站消息最终都会转为 ByteBuf 输出,一直向前传,由 HeadContext flush 后 release
-
不确定 ByteBuf 被引用了多少次,但又必须彻底释放,可以循环调用 release 直到返回 true
拷贝操作
零拷贝方法:
-
ByteBuf slice(int index, int length):对原始 ByteBuf 进行切片成多个 ByteBuf,切片后的 ByteBuf 并没有发生内存复制,共用原始 ByteBuf 的内存,切片后的 ByteBuf 维护独立的 read,write 指针public static void main(String[] args) { ByteBuf buf = ByteBufAllocator.DEFAULT.buffer(10); buf.writeBytes(new byte[]{'a', 'b', 'c', 'd', 'e', 'f', 'g', 'h', 'i', 'j'}); // 在切片过程中并没有发生数据复制 ByteBuf f1 = buf.slice(0, 5); f1.retain(); ByteBuf f2 = buf.slice(5, 5); f2.retain(); // 对 f1 进行相关的操作也会体现在 buf 上 } -
ByteBuf duplicate():截取原始 ByteBuf 所有内容,并且没有 max capacity 的限制,也是与原始 ByteBuf 使用同一块底层内存,只是读写指针是独立的 -
CompositeByteBuf addComponents(boolean increaseWriterIndex, ByteBuf... buffers):合并多个 ByteBufpublic static void main(String[] args) { ByteBuf buf1 = ByteBufAllocator.DEFAULT.buffer(); buf1.writeBytes(new byte[]{1, 2, 3, 4, 5}); ByteBuf buf2 = ByteBufAllocator.DEFAULT.buffer(); buf1.writeBytes(new byte[]{6, 7, 8, 9, 10}); CompositeByteBuf buf = ByteBufAllocator.DEFAULT.compositeBuffer(); // true 表示增加新的 ByteBuf 自动递增 write index, 否则 write index 会始终为 0 buf.addComponents(true, buf1, buf2); }CompositeByteBuf 是一个组合的 ByteBuf,内部维护了一个 Component 数组,每个 Component 管理一个 ByteBuf,记录了这个 ByteBuf 相对于整体偏移量等信息,代表着整体中某一段的数据
- 优点:对外是一个虚拟视图,组合这些 ByteBuf 不会产生内存复制
- 缺点:复杂了很多,多次操作会带来性能的损耗
深拷贝:
ByteBuf copy():将底层内存数据进行深拷贝,因此无论读写,都与原始 ByteBuf 无关
池化相关:
-
Unpooled 是一个工具类,提供了非池化的 ByteBuf 创建、组合、复制等操作
ByteBuf buf1 = ByteBufAllocator.DEFAULT.buffer(5); buf1.writeBytes(new byte[]{1, 2, 3, 4, 5}); ByteBuf buf2 = ByteBufAllocator.DEFAULT.buffer(5); buf2.writeBytes(new byte[]{6, 7, 8, 9, 10}); // 当包装 ByteBuf 个数超过一个时, 底层使用了 CompositeByteBuf,零拷贝思想 ByteBuf buf = Unpooled.wrappedBuffer(buf1, buf2);